张高兴的 .NET IoT 入门指南:(二)GPIO 的使用
时间:2025-12-21 11:58:56
什么是 gpio
GPIO是通用输入输出的简称,意在提供一个灵活且多功能的接口以实现硬件扩展和连接外部设备的功能。例如,Raspberry Pi拥有两列GPIO引脚,通过这些引脚能够与其他传感器或设备相连,用于各种应用需求。

Raspberry Pi B+/2B/3B/3B+/Zero 引脚图
在处理GPIO引脚时,有三种主要的模式:输出模式、输入模式以及特殊的上拉和下拉输入模式。输出模式类似于电源控制器,允许你根据需要为外设如LED灯供电。而输入模式则负责接收外部设备发出的信号。除此之外,还有一种特殊的功能:上拉输入(INPUT_PULLUP),这意味着内部会连接一个上拉电阻至VCC,这样引脚会被设置为高电平。相反,下拉输入则使用一个下拉电阻接低电平。
GPIO通常采用标准逻辑电平,表示高低两种状态,用二进制的表示。在这些电平之间还存在一个阈值电平,意味着从低到高的转换边界。Arduino系统将-读作低电平,而则对应高电平。值得注意的是,Raspberry Pi对这种标准的解读并未找到相关资料。此外,GPIO还可用于中断请求,即通过设定GPIO为输入模式,当达到预设条件时触发中断事件。
相关类
GPIO 操作主要依赖于 GpioController 类 。这个类位于 System.Device.Gpio 名称空间下。GpioController代码语言:javascript代码运行次数:0
运行
复制
// GpioController 即 GPIO 控制器// GPIO 引脚依靠 GpioController 初始化public class GpioController : IGpioController, IDisposable{ // 构造函数 public GpioController { } // PinNumberingScheme 即引脚编号方案,是一个枚举类型,包含 Board 和 Logical 两个值。 public GpioController(PinNumberingScheme numbering) { } // GpioDriver 用于指定要使用的 GPIO 驱动,比如 libgpiod 或 sysfs public GpioController(PinNumberingScheme numberingScheme, GpioDriver driver) { } // 方法 // 打开 GPIO 引脚 // pinNumber 需要填写和 PinNumberingScheme 相对应的值。 // PinMode 是设置 GPIO 的模式,如输入、输出、上拉、下拉 public void OpenPin(int pinNumber, PinMode mode) { } // 关闭 GPIO 引脚 public void ClosePin(int pinNumber) { } // 判断某个引脚是否打开 public bool IsPinOpen(int pinNumber) { return false; } // 读取指定引脚的值 public PinValue Read(int pinNumber) { return null; } // 向指定的引脚写入值 public void Write(int pinNumber, PinValue value) { } // 为指定引脚的值改变时注册回调(即上文中提到的 GPIO 中断) public void RegisterCallbackForPinValueChangedEvent(int pinNumber, PinEventTypes eventTypes, PinChangeEventHandler callback) { } // 为指定引脚的值改变时注销回调 public void UnregisterCallbackForPinValueChangedEvent(int pinNumber, PinChangeEventHandler callback) { }}
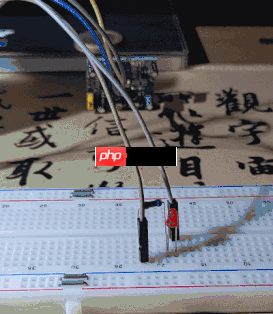
人体红外传感器实验
人体红外传感器是一种基于周围区域的红外热来检测运动的设备,通常被称为被动红外传感器(PIR)。在本文中,我们将使用HC-SR号的传感器。当你检测到有人体时,LED小灯会亮起;而当没有检测到人时,LED小灯则会熄灭。传感器的工作原理基于热敏感性材料的温度变化,这种变化使得LED小灯的亮度随温度上升或下降而改变。
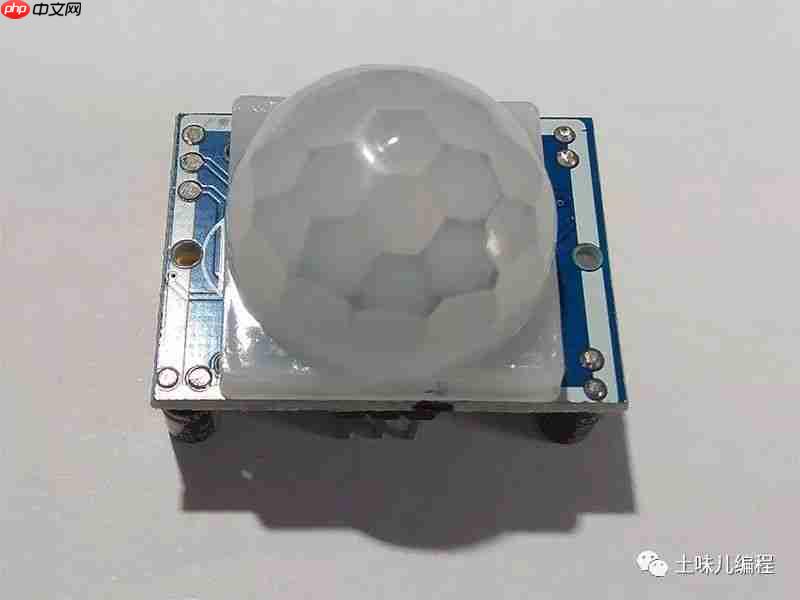
HC-SR501
硬件需求
名称
数量
HC-SR501
x1
LED 小灯
x1
- Ω 电阻
x1
杜邦线
若干
电路
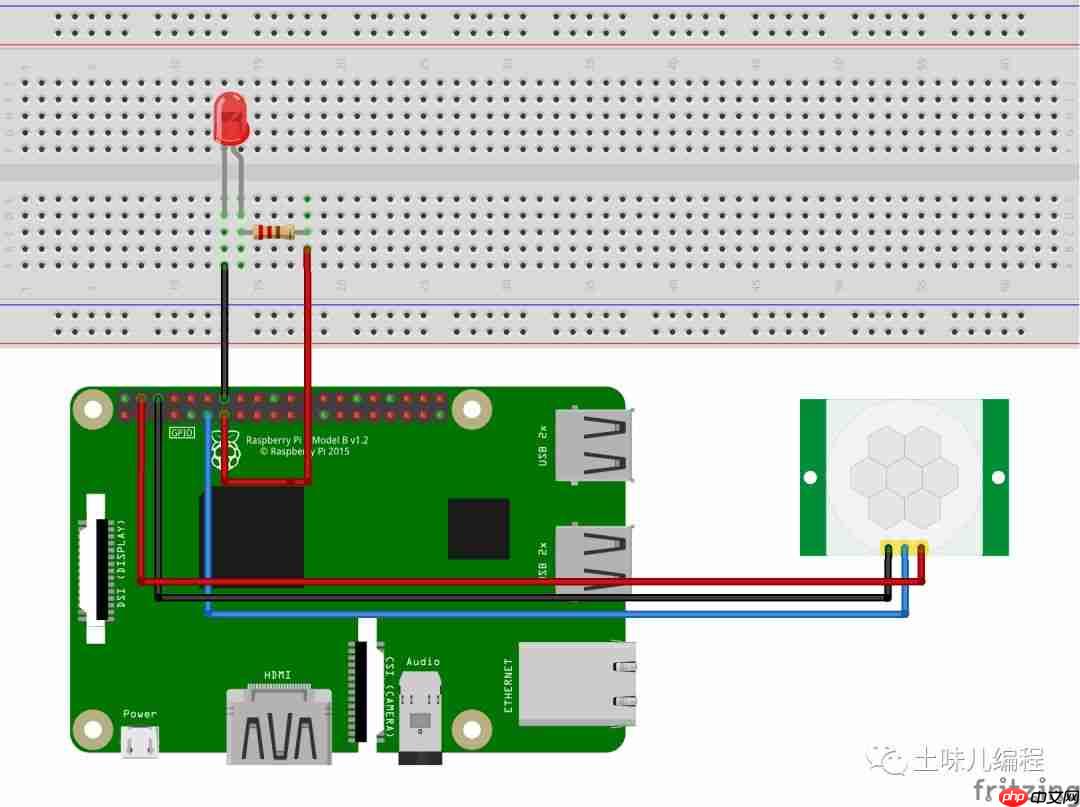
HC-SR501VCC - 5VGND - GNDOUT - GPIO 17 (Pin 11)
LEDVCC & 220 Ω resistor - GPIO 27 (Pin 14)GND - GND
使用 Docker 运行示例
示例地址:https://github.com/ZhangGaoxing/dotnet-core-iot-demo/tree/master/src/Hcsr501代码语言:javascript代码运行次数:0
运行
复制
docker build -t pir-sample -f Dockerfile .docker run --rm -it --device /dev/gpiomem pir-sample登录后复制
代码
打开 Visual Studio ,新建一个 .NET Core 控制台应用程序,项目名称为“PIR”。
引入 System.Device.Gpio NuGet 包。
新建类 Hcsr501,替换如下代码:代码语言:javascript代码运行次数:0
运行
复制
public class Hcsr501 : IDisposable{ private GpioController _controller; private readonly int _outPin; /// <summary> /// 构造函数 /// </summary> /// <param name="pin">OUT Pin</param> public HCSR501(int outPin, PinNumberingScheme pinNumberingScheme = PinNumberingScheme.Logical) { _outPin = outPin; _controller = new GpioController(pinNumberingScheme); _controller.OpenPin(outPin, PinMode.Input); } /// <summary> /// 是否检测到人体 /// </summary> public bool IsMotionDetected => _controller.Read(_outPin) == PinValue.High; /// <summary> /// Cleanup /// </summary> public void Dispose() { _controller"http://www.w3.org/2000/svg" viewbox="0 0 16 16" fill="none">
运行
复制
static void Main(string[] args){ // HC-SR501 OUT Pin int hcsr501Pin = 17; // LED Pin int ledPin = 27; // 获取 GPIO 控制器 using GpioController ledController = new GpioController(PinNumberingScheme.Logical); // 初始化 PIR 传感器 using Hcsr501 sensor = new Hcsr501(hcsr501Pin, PinNumberingScheme.Logical); // 打开 LED 引脚 ledController.OpenPin(ledPin, PinMode.Output); while (true) { // 检测到了人体 if (sensor.IsMotionDetected == true) { ledController.Write(ledPin, PinValue.High); Console.WriteLine("Detected! Turn the LED on."); } else { ledController.Write(ledPin, PinValue.Low); Console.WriteLine("Undetected! Turn the LED off."); } Thread.Sleep(1000); }}登录后复制
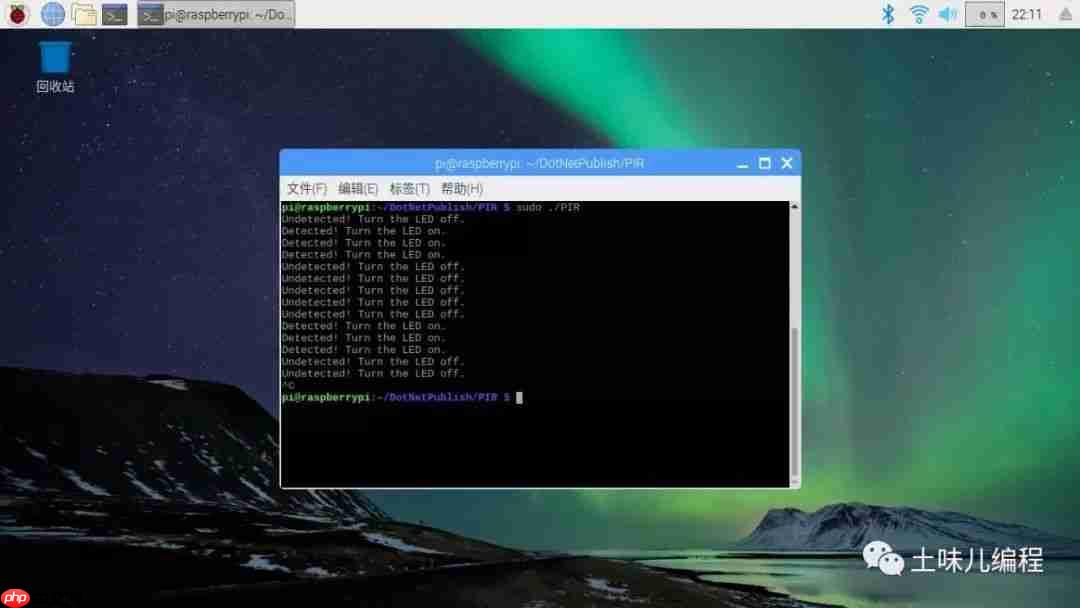
发布、拷贝、更改权限、运行
效果图
? 如何改进?
剔除主函数循环,尝试使用 RegisterCallbackForPinValueChangedEvent() 注册一个回调进行检测。参考General-purpose input/output - Wikipedia:https://en.wikipedia.org/wiki/General-purpose_input/outputGPIO - Raspberry Pi Documentation:https://www.raspberrypi.org/documentation/usage/gpio/GPIO source code:https://github.com/dotnet/iot/tree/master/src/System.Device.Gpio/System/Device/Gpio
以上就是张高兴的 .NET IoT 入门指南:(二)GPIO 的使用的详细内容,更多请关注其它相关文章!